![]()
All fields other than Special Leave, Leave Code and Leave Name can be changed before submission.
How to Configure Leave Types?
Why should I use this form?
This form facilitates the configuration of leave types in an organization. There can be more than one Leave Type for the selected configuration period.
A Leave type can be configured unit wise/Location wise/Grade wise/employee status wise etc. Multi selection is possible for each of these columns. Details such as leave type applicable to, min and max days to be applied etc. are configured here. Also, it allows the facilitator to indicate whether negative balance is allowed, half day is allowed, past days are allowed, intervening holidays/weekly offs to be included etc..
|
All fields other than Special Leave, Leave Code and Leave Name can be changed before submission. |
What are the Pre-requisites?
· Location and Grade Master should be created.
· OU should be created
· Status of the employee
· ESI and Non ESI
· Contract Type
Make sure all these parameters are available before we proceed.
Who can access this form?
This form shall be visible to all employees to whom the visibility is given in Setup HRMS ® Module Role Mapping/ Module Administration.
How to navigate to this form?
Workforce Administration à Absence à Leave Configuration.
List of existing leave types are shown in the grid. If no leave type is available, then this grid will be empty.
The field guidelines are as follows:
Field |
Description |
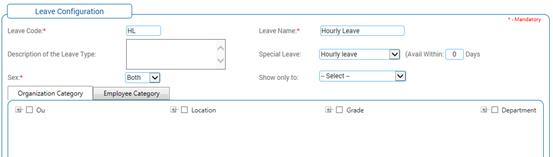
Leave code |
Enter unique Leave code for the leave type. Leave code will be the short form for the Leave Name. E.g.: Sick Leave will be shortened as SL. Note: It is not possible to modify the name. It accepts alphabets and numeric values (No special characters). The width of this field is limited to 5. |
Leave Name |
Enter Leave Name for the leave type. This will be the name of the Leave type – the original longer version. Note: It accepts alpha numeric & special character. The width of this field is limited to 64. |
Description of the Leave Type |
Enter the description of the leave type selected. |
Special Leave |
Select the Special Leave to define Leave type for Birthday, Wedding, and Compensatory Off, DOJ Anniversary Leave, Star Leave, Founders Day Leave, if required. · The Compensatory Off type allows the employees to avail Compensatory Leave when they work on a weekly off/holiday. Note: The ‘Avail within’ option facilitates the number of days within which, the compensatory leave should be availed, else it will lapse. · Hourly Leave – Defining this leave type allows employees to avail short periods of leave (on hourly basis). Click here to view more on Hourly leave. · DOJ Anniversary Leave – This leave type allows the employees to avail one day leave on the date of joining anniversary of the employee. For example, if date of joining is on 4th Jan 2007, this leave can be taken on 4th Jan 2008, 4th Jan 2009 and so on. For more information on options for setting this leave, please refer “Anniversary Leave Configuration” section. · Founders Day Leave – This leave type can be availed by employees who have joined prior to the cut off date as set in the ‘Leave Additional Configuration’ form. For more information on options for setting this leave, please refer “Anniversary Leave Configuration” section. · Star Leave - All employees who have completed specified number of months (as set in the ‘Leave Additional Configuration’ form) in the organization are eligible for availing this type of leave. For more information on options for setting this leave, please refer “Anniversary Leave Configuration” section. |
Sex |
Select the gender of the employee(s) to whom the Leave is applicable. Note: Select Both to allow all the (male/female) employees to request and cancel the leave, irrespective of the gender. |
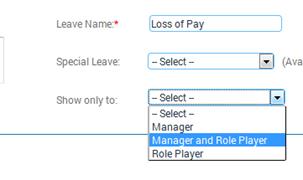
Show only to |
This is for restricting the visibility of leave type to role player or manager. These leave type will be available only for the role player / manager / both based on Module Role Mapping. Role player / manager can alone raise leave request for this leave type when raising leave for ‘Self’ or for an ‘Employee under their facilitation’. This leave type will not be visible to other employees.
· Manager - If this option is selected, then that leave type will be visible only to reporting managers. · Manager and Role Player – If this option is selected, then the leave type will be visible to the reporting manager and the role player. · Role Player – If this option is selected, then the leave type will be visible only to role player. |
OU, Location, Grade, and Employee Status |
Select the OU, Location, Grade, and Employee Status to which the leave will be applicable. Enable the parent check box to select all the listed OUs/Locations/Grades /Employee Status/ESI/Non-ESI/Contract type. |
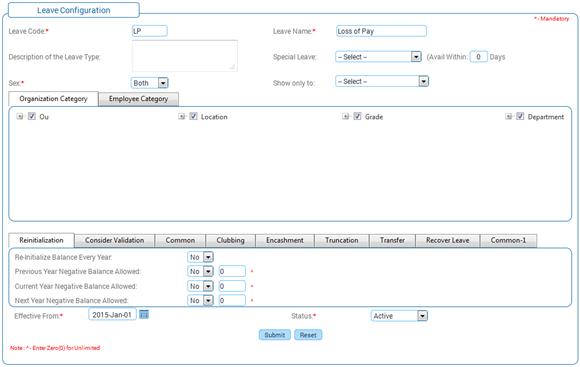
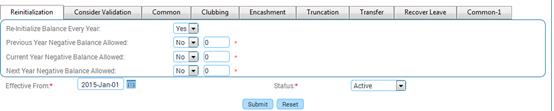
2.3.1 What is Re-initialization?
Re-initialization is to indicate if the previous year’s leave balance is to be carried forward to next year or not. If this is selected as ‘Yes’, then the previous year’s leave balance will be shown separately under ‘PP Balance’ column. If it is selected as ‘No’, then the ‘PP Balance’ column will be ‘0’ and the ‘Current Balance’ column shows the sum of current year balance and the previous year’s balance.
For example, an employee has 5 days of leave in the previous year and 8 days in the current year. The re-initialization option is selected as ‘Yes’. In this case, after the execution of leave credit scheduler, the employee’s leave balance will be shown as ‘PP Balance = 5’ and ‘Current Balance = 8’.
If the re-initialization option is selected as ‘No’ then the PP Balance will be ‘0’ and current Balance will be 13.
How to use this tab?
Field |
Description |
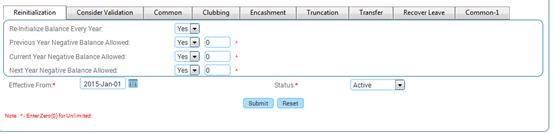
Re-Initialize Balance every year |
This is to specify whether the leave balance has to be re-initialized every year. Select ‘Yes’ or ‘No’. If this option is selected as ‘Yes’ then, the number of days will be deducted from the current, previous, and next year’s leave balances as per leave availed dates. If this option is selected as ‘No’ then, the number of days will be deducted only from the current leave balance. |
Previous Year Negative Balance Allowed |
Select ‘Yes’ or ‘No’. This is to specify whether Previous Year negative balance is allowed for the Leave type or not. |
Current Year Negative Balance Allowed |
Select ‘Yes’ or ‘No’. This is to specify whether current year negative balance is allowed for the Leave type or not. |
Next Year Negative Balance Allowed |
Select ‘Yes’ or ‘No’. This is to specify whether Next Year Negative Balance is Allowed for the Leave type or not. |
Note: When the Negative balance allowed is set as ‘Yes’ for current/past/future period), then the maximum number of negative days allowed can be configured for that particular period. |
|
|
If the Negative Balance Allowed option is selected as ‘No’ then the employee will not be allowed to raise leave request if the available Leave balance is zero or equal to ‘Leave pending for approval’. |
The Special leaves (e.g. Birthday/Wedding anniversary) are not carry forwarded to the next year. During the credit, the previous year special leave balance is nullified and only the current year balance is updated. In Leave Configuration Re-initialization is set ‘Yes’ to avoid the carry forward where as the leaves can be accrued if ‘Re-initialization’ is set as ‘No’.
In Leave Configuration, if Re-initialization is set as ‘No’ and Truncation as ‘Yes’, the system maintains single balance as Current Balance. If a leave is applied from 30-Dec to 2-Jan (across multiple leave accounting period), then December month leave is deducted from the PP balance and January leave is deducted from the Current Balance. The lapsed balance is maintained in PP balance of employee in case of re-initialization is set as either ‘Yes/No’ and if truncation is ‘Yes’ to regularize the past balances.

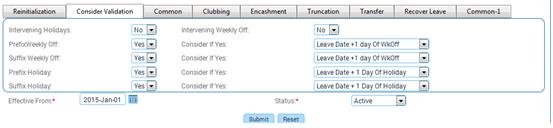
What is Consider Validation tab?
This is to indicate validations for this leave type.
How to use this tab?
Field |
Description |
Intervening Holidays/Weekly Offs |
This is to specify whether the holidays and weekly-offs falling in between a leave period is to be considered as leave (Yes) or (No). |
Prefix Weekly off Yes/No |
This is to specify whether the leave can be taken on the day before a weekly off or not. For example, if Saturday and Sunday are declared as weekly off and whether an employee can avail a leave on Friday. |
Suffix Weekly off Yes/No |
This is to specify whether the leave can be taken after a weekly off or not. For example, if Saturday and Sunday are declared as weekly off and whether an employee can avail leave on Monday. |
Prefix Holiday Yes/No |
This is to specify whether the leave can be taken before a holiday or not. For example, if Wednesday is declared as a holiday and whether an employee can avail leave on Tuesday. |
Suffix Holiday Yes/No |
This is to specify whether the leave can be taken after a holiday or not. For example, if Wednesday is declared as a holiday and whether an employee can avail a leave on Thursday. |
Consider if Yes |
Select the combination of leave, if the number of days is deducted from the available leave balance of an employee. The Combinations to be considered are as follows: · Only the Leave Date(s) – will deduct only the availed number of days. · Leave Date + 1 Day of weekly off/holiday – will deduct the availed number of days + one day from the weekly off (wkoff) or holiday. · Leave Date + whole weekly off/holiday – will deduct the availed number of days + preceding/succeeding weekly off/ holiday. This applies to Prefix weekly off/Suffix weekly off/Prefix holiday/ Suffix Holiday |
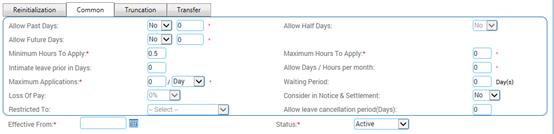
Effective From |
Select the Effective From date. |
Status |
Select the status to specify whether it is Active/Inactive. |
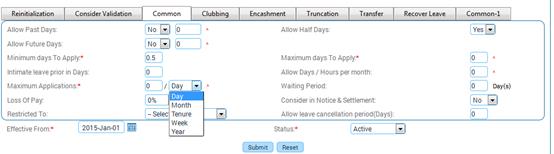
What does the Common tab define?
This tab contains generic attributes that a leave type will have.
How to use this tab?
Field |
Description |
||
Allow Past Days |
Select ‘Yes’ or ‘No’. This is to specify whether application for this leave type can be done for past days. Note: If this option is selected as ‘No’, then the employees are not allowed to raise leave request for past dates (including Comp-off). |
||
Allow Future Days |
Select ‘Yes’ or ‘No’. This is to specify whether application for this leave type can be done for future days. Note: If this option is selected as ‘No’, then the employees are not allowed to raise leave request for future dates (including Comp-off). |
||
Note: When the Allow Past Days and Allow Future Days is set as ‘Yes’ then the maximum number of days allowed can be configured. |
|||
Allow Half Day |
Select ‘Yes’ or ‘No’. This is to specify whether half day is allowed for a particular leave type. Note: When half day is ‘Yes’ then minimum number of days to apply will be automatically set as 0.5. |
||
Min. days to apply/ Max. days to apply |
This is to specify the minimum number of days and maximum number of days to be applied for the leave type in a single application. Enter the number of days. Note: For defining unlimited number of days, enter zero (0). |
||
Notice Period in Day (s) |
This is to specify the number of days prior to which the leave has to be applied. Enter the number of days. |
||
Allow Day(s)/Month |
This is to specify the number of leaves that can be availed in a month for that particular leave type. Enter the number of days. Note: For defining unlimited number of days, enter Zero (0). |
||
Maximum Applications |
This is to specify the maximum number of applications that can be raised for the Leave type in a year. Enter the number of days. Note: For defining unlimited number of applications in a year, enter Zero (0). |
||
Waiting Period |
This is to specify the number of days required after which a newly joined employee can view/avail this leave type. Enter the number of days. |
||
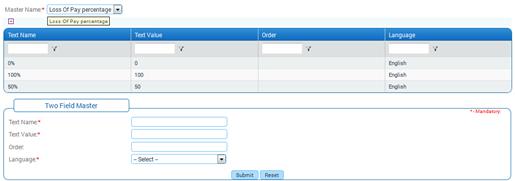
Loss of Pay |
This is to specify loss of pay percentage. This information is passed on to Adrenalin Payroll software if it is being used in addition to the Adrenalin HR software for deductions from pay. Note: Only if the loss of pay is greater than 0, then the details will be sent to Payroll for calculation.
The LOP percentage can be configured using Two Field Master (AdministrationàSetup HRMS) by selecting the Master Name as ‘Loss of Pay percentage’.
|
||
Consider in Notice & Settlement |
Select ‘Yes’ or ‘No’. This is to specify whether the leave type is considered while an employee is serving notice period. If this option is selected as “Yes”, then the employee is allowed or disallowed to avail leave based on [Consider_Notice] configuration in Adrenalin Configuration editor. If this option is selected as ‘No’, then the employee is allowed to avail leave while he/she is serving notice period. |
||
Restricted to |
This is to specify the calendar to which the leave type is mapped. To create a Restricted/Optional Holiday: Create a Calendar for the Restricted Holiday and associated holidays to the calendar. Map the Leave type to the Restricted/Optional holiday |
||
Allow leave cancellation period (Days) |
This is to specify the number of days within which the employee can cancel his leave. For example, if this is given as ‘5’, the employee can cancel his approved leave within 5 days from the date of approval. |
||
Clubbing defines the process of combining one leave with another leave. This option facilitates to know the type of leave that are not to be clubbed with the current leave type.
For example, a Leave Type ‘Sick Leave’ is configured with ‘Annual Leave’ and ‘Unpaid Leave’ is selected as ‘Leave type not to Club with’. An employee who applies for Sick Leave will not be able to club the Sick Leave with ‘Annual Leave’ and ‘Unpaid Leave’.

How to use this tab?
Field Name |
Description |
Leave Type not to club with |
Select the checkbox of the leave types that should not be clubbed with the present configured leave. |
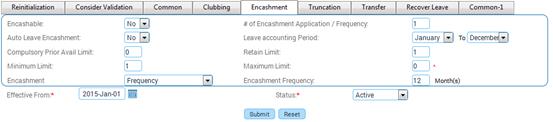
Encashment is availing cash benefit in lieu of unavailed leave. For example, an employee is eligible for 15 days of leave in a year, out of which 10 days is availed and remaining 5 days leave is unavailed. In this case, the employee can opt for encashing the 5 days leave in accordance with the policies of the organization.
How to use this tab?
Field |
Description |
Encashable |
Select ‘Yes’ or ‘No’. This is to specify whether the leave is encashable. If this option is selected as ‘No’ then the employee cannot encash this type of leave. |
# of Encashment Application /Frequency |
This is to specify the maximum number applications for encashment that can be raised for a frequency. |
Auto Leave Encashment |
This is to set Leave encashment to populate automatically. If this option is selected as ‘Yes’ then all other fields in this tab will be disabled. |
Leave Accounting Period |
This is to specify the leave period that is to be taken into account. Select the period. |
Compulsory Prior Avail Limit |
This is to specify the number of days to be availed compulsorily in the current leave accounting year prior to encashment. |
Retain Limit |
This specifies that the employee has to maintain certain amount of leave balance while encashing. Only the balance leave excluding the retain limit days can be encashed. |
Minimum/Maximum Limit |
This is to specify the minimum and maximum number of days an employee can encash for a particular leave type. |
Encashment |
This is to specify the type of encashment. If Separation is selected, then it cannot be encashed using the encashment form. Encashment will be done only at the time of separation of an employee. If Encashment is selected then it can be encashed using the Leave Encashment form. |
Encashment frequency in month(s) |
This is to specify the month in which the encashment has to be done. Enter the number of months. Note: The encashment frequency should not exceed 12 months. |
This form helps in specifying the maximum leave that can be accumulated by an employee at any given point of time. This is done by truncating the leave that is in excess of the limit specified. When option 'no' is selected for the leave, truncation will not happen, when option 'yes' is selected and based on the given conditions the truncations will be effected.

How to use this tab?
Field |
Description |
||||||||||||||||||||||||||||||||||||||||||
Truncation |
Select Yes/No. This specifies whether the leave has to be truncated. |
||||||||||||||||||||||||||||||||||||||||||
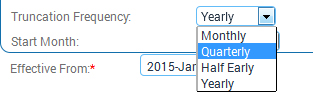
Truncation Frequency |
This is to specify whether Monthly, Quarterly, Half Yearly or Yearly in which the truncation cycle should take place.
Note: · For existing users, the ‘Truncation Frequency’ will be defaulted to ‘Yearly’ option. · For existing users, the ‘Start Month’ will be defaulted to the month corresponding to the value they have already entered. For example, if they have entered ‘4’ earlier, now this field will be shown as ‘April’ selected by default. If they have entered as ‘2’ earlier, now this field will be shown as ‘February’ selected by default. |
||||||||||||||||||||||||||||||||||||||||||
Start Month |
Select the Start Month for the Truncation cycle from the drop down field. |
||||||||||||||||||||||||||||||||||||||||||
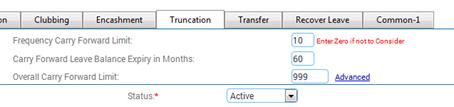
Frequency Carry Forward Limit |
Based on the Truncation Frequency. Frequency Carry Forward Limit functions. For example, consider a case where there 5 days to carry forward, if the Truncation Frequency is set as ‘Monthly’ and Frequency Carry Forward Limit is entered as ‘3’ then only 3 days will carried forward. The remaining 2 days will be elapsed. |
||||||||||||||||||||||||||||||||||||||||||
Carry Forward Leave Balance Expiry in Months |
This is to specify the validity of the carry forwarded leave balance. Beyond the specified month(s), the carry forwarded balance gets expired from the date of leave carry forward.
For example ‘Carry Forward Leave Balance Expiry in Months’ is entered as ‘60’ (5 Years) Then at beginning of the 6th Year, the First Year leave balance gets expired. Likewise on the 7th Year, the Second Year leave balance gets expired. 1st Year – 5 days 2nd Year – 7 days 3rd Year – 4 days 4th Year – 8 days 5th Year – 5 days In this case on the ‘6th Year’ 1st Year carry forward of 5 days will get expired and on ‘7th Year’ the 2nd Year carry forward of 7 days will get expired and so on. Note: The scheduler “Leave Expiry Balance Truncation” has to be set for truncating the leave balances as per the configuration.
|
||||||||||||||||||||||||||||||||||||||||||
Yearly Carry Forward Limit |
This is to specify the Maximum leave days that can be carried forward in the current year. For example, if the yearly balance is 20 and carry forward limit is set as 12, then only 12 days will be carried forward to next year and the remaining 8 days will be moved to PP balance. Note: It accepts numeric values only. The width of this field is limited to 5.Half a day leave can be mentioned as.0.5 |
||||||||||||||||||||||||||||||||||||||||||
Overall Carry Forward Limit |
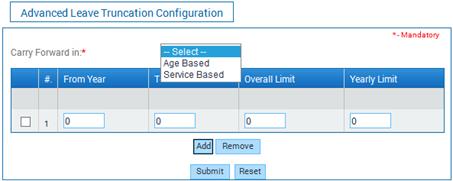
This is to specify the overall Maximum leave days that can be carried forward. Note: It accepts numeric values only. The width of this field is limited to 5.Half a day leave can be mentioned as 0.5. Click the link ‘Advanced’ to set age wise leave truncation configuration. On clicking this link, a popup window appears, allowing to specify Age Based leave carry forward and Service Based leave carry forward, as shown below:
Click [Add] to add more details. After entering necessary details, click [Submit] to save the details and close the popup window. Any leave in excess would lapse automatically. Note: For existing users, the Carry forward option will be defaulted to ‘Age based’ option. |
This functionality has been introduced to transfer the number of days to the selected leave type on certain criteria.
For example, a Temporary leave can be created with an option 'On Confirmation' and it is Lend to 'Earned leave'. This can be mapped to employees whose status is 'Probation'. A condition can be set where, on confirmation of employee, transfer the number of days to 'Earned Leave'.
Note: Number of leave will be added to this selected leave on confirmation or after certain specified number of days of joining.

How to use this tab?
Field |
Description |
Leave Transfer |
This is to specify whether the leave is transferable. On Confirmation- upon enabling this, the leave is transferred after the confirmation of the employee. After DOJ- Enabling this denotes that the leave can be transferred after specific days from the employees Date of Joining, irrespective of his/her confirmation. For example, if 20 is given in this field, number of days will be transferred on the 21st day of joining of the employee. |
Lend to |
Select the Leave Type to which the leave days has to be lend to. Note: It accepts numeric values only. The width of this field is limited to 4. |
This facility provides for transfer of leave balance from one type to another type of leave, in the event of insufficient leave balance in a particular type of leave. This is done based on the order set in this tab.

For example, an employee has a balance of 5 days for leave type 1, 10 days for leave type 2 and 7 days for leave type 3. If the Employee applies for 21 days of leave for leave type 1, then after deducting the 5 days from leave type 1, system deducts the 10 days leave from leave type 2, and 6 days from leave type 3.
How to use this tab?
The field guidelines are as follows.
Field |
Description |
Recover Leave Balance |
Select Yes/No to specify if the Leave balance has to be selected |
Effective from |
Select the From date the Leave has to be recovered |
Status |
Select the status to specify whether the Recover Leave option is Active/Inactive |
2.3.9 What does the common-1 tab defines?
This tab facilitates configuring the child care leave and weekend leave.

How to use this tab?
Field |
Description |
Child Care Leave |
Select Yes/No to specify if this leave type is of Child care category. |
Age In |
Select the age in ‘Days/Months/Years’ from the dropdown field. |
Min Age & Max Age |
Enter the minimum and maximum Age of the child to be considered for this leave. |
Week-end Leave |
This specifies the number of days an Employee can take leave in the specified period prefixing or suffixing a weekend. |
Leave Period |
Select the frequency period of the leave |
No of days allowed |
Enter the number of days that can be taken as leave. For example, if the leave period is selected as ‘Quarterly’ and the number of days allowed is entered as 1, then it means that an Employee can take one day leave on Friday or Monday only once in a quarter. Second application will not be allowed. |
Support Document Required |
Select this option if the leave request of this type should have a supporting document. |
Note: The Child Care Leave will be applicable to employees only if the information about their son/daughter is available under Family Details form.
Select the Effective from date from the calendar. This will be the Date from which the configured leave will start.
Select Status to specify whether the Leave is active or inactive.
Note: An inactive leave type cannot be used.
Click [Submit] to save the details.
Click [Reset] to refresh the form.
When the configurations are saved, scheduler has to be configured for the execution of the leave transfer and truncation. Based on the leave configurations set in this form, the scheduler will be executed and leave transfer and truncation will take place.
Post Activity
Configured leave types will be stored in tables. Leave created here will appear in Leave Request, Leave Encashment, Leave Balance Adjustment, and Leave Credit Configuration forms (based on the configuration options).
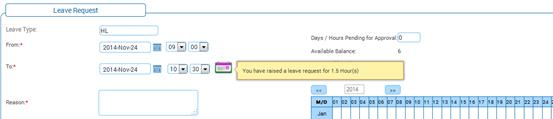
Special Leave type of ‘Hourly Leave’ allows employees to avail short periods of leave (on hourly basis) which may be in relation to an emergency or any other personal reasons. This is especially beneficial for hourly paid staff who work part time and can avail leave in terms of hours.
When leave type is selected, then only the following tabs will be available for configuring the leave details.
Re-initialization
Common
Truncation
Transfer
This hourly leave will be applicable for Leave Request, Cancellation and Leave credit in terms of hours.
When this option is selected in Leave Configuration form, following changes happens in Common tab.
· Allow Future and past days with precision of 1 and in terms of .5
· If the hourly leave is defined the decimal will be restricted to 1 and in terms of .5 hence credit can be done like 99.5, 99.0 where 99.5 will mean 99 hours 30 min.
· ‘Allow Half days’ option will be disabled.
· Minimum days to apply and maximum days to apply will be changed as ‘Minimum hours to apply’ and ‘Maximum Hours to apply’ and will accept single decimal precision in terms of .5
· ‘Notice period in days’ will be changed as ‘Intimate leave prior in Days’
· Allow days per month will be changed as ‘Allow days/Hours per month and will accept input in terms of hours.
· Loss of Pay and Restricted to will be disabled
· The default value of ‘Allow Leave Cancellation period (Days) will be 0.
Truncation tab
Following are the changes in Truncation tab.
· Frequency carry forward limit and overall carry forward limit will accept hours.

Transfer tab
Following are the changes in Transfer tab.
· Lend to will list only leave type of type hourly

Leave Request
If Hourly leave type is selected, then the options ‘Full day’, ’FN’, AN’ will not be visible and will show the Time option to choose. Accordingly, on mouse over the calendar icon displays the duration of leave in hours.